目录
项目创建
1. 安装脚手架
shellnpm install -g yo generator-code
cd 到项目目录,运行
shellyo code
2. 运行看效果
构建完成后,直接用vscode打开项目,按F5运行项目,此时会弹出一个新的vscode窗口(类似我们写html后,会运行浏览器来看效果,新打开的vscode窗口就起到浏览器相同的作用)。
同时按下ctrl+shift+p,在输入框中输入Hello Word,即可在右下角看到插件运行的消息
3. 项目结构
主要配置文件:extension.ts 和 package.json
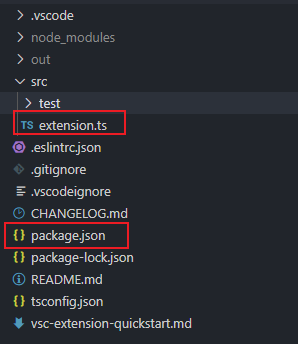
package.json关键内容如下:
json	"name": "vscode-plugin-bear",
	"displayName": "vscode-plugin-bear",
	"description": "My VSCode plugin",
	"version": "0.0.1",
	"publisher": "bear",
	"engines": {
		"vscode": "^1.27.0"
	},
	"categories": [
		"Other"
	],
	"activationEvents": [
		"onCommand:extension.helloWorld"
	],
	"main": "./out/extension.js",
	"contributes": {
		"commands": [
			{
				"command": "extension.helloWorld",
				"title": "Hello World"
			}
		]
	}
关键说明:
- name 和 publisher:VS Code使用<publisher>.<name>作为插件的唯一ID,例如我这里会以bear.vscode-plugin-bear作为唯一ID。
- displayName:插件展示名称
- description:插件自我描述
- version:版本号
- engines:使用此插件的VS Code最低版本要求
- categories:插件分类,可选值[Programming Languages, Snippets, Linters, Themes, Debuggers, Formatters, Keymaps, SCM Providers, Other, Extension Packs, Language Packs]
- activationEvents:拓展可被激活的事件数组
- main:入口文件
- activationEvents
貌似有博主描述的更全面,这里拿来用用:
json{
	// 插件的名字,应全部小写,不能有空格
	"name": "vscode-plugin-demo",
	// 插件的友好显示名称,用于显示在应用市场,支持中文
	"displayName": "VSCode插件demo",
	// 描述
	"description": "VSCode插件demo集锦",
	// 关键字,用于应用市场搜索
	"keywords": ["vscode", "plugin", "demo"],
	// 版本号
	"version": "1.0.0",
	// 发布者,如果要发布到应用市场的话,这个名字必须与发布者一致
	"publisher": "sxei",
	// 表示插件最低支持的vscode版本
	"engines": {
		"vscode": "^1.27.0"
	},
	// 插件应用市场分类,可选值: [Programming Languages, Snippets, Linters, Themes, Debuggers, Formatters, Keymaps, SCM Providers, Other, Extension Packs, Language Packs]
	"categories": [
		"Other"
	],
	// 插件图标,至少128x128像素
	"icon": "images/icon.png",
	// 扩展的激活事件数组,可以被哪些事件激活扩展,后文有详细介绍
	"activationEvents": [
		"onCommand:extension.sayHello"
	],
	// 插件的主入口
	"main": "./src/extension",
	// 贡献点,整个插件最重要最多的配置项
	"contributes": {
		// 插件配置项
		"configuration": {
			"type": "object",
			// 配置项标题,会显示在vscode的设置页
			"title": "vscode-plugin-demo",
			"properties": {
				// 这里我随便写了2个设置,配置你的昵称
				"vscodePluginDemo.yourName": {
					"type": "string",
					"default": "guest",
					"description": "你的名字"
				},
				// 是否在启动时显示提示
				"vscodePluginDemo.showTip": {
					"type": "boolean",
					"default": true,
					"description": "是否在每次启动时显示欢迎提示!"
				}
			}
		},
		// 命令
		"commands": [
			{
				"command": "extension.sayHello",
				"title": "Hello World"
			}
		],
		// 快捷键绑定
		"keybindings": [
			{
				"command": "extension.sayHello",
				"key": "ctrl+f10",
				"mac": "cmd+f10",
				"when": "editorTextFocus"
			}
		],
		// 菜单
		"menus": {
			// 编辑器右键菜单
			"editor/context": [
				{
					// 表示只有编辑器具有焦点时才会在菜单中出现
					"when": "editorFocus",
					"command": "extension.sayHello",
					// navigation是一个永远置顶的分组,后面的@6是人工进行组内排序
					"group": "navigation@6"
				},
				{
					"when": "editorFocus",
					"command": "extension.demo.getCurrentFilePath",
					"group": "navigation@5"
				},
				{
					// 只有编辑器具有焦点,并且打开的是JS文件才会出现
					"when": "editorFocus && resourceLangId == javascript",
					"command": "extension.demo.testMenuShow",
					"group": "z_commands"
				},
				{
					"command": "extension.demo.openWebview",
					"group": "navigation"
				}
			],
			// 编辑器右上角图标,不配置图片就显示文字
			"editor/title": [
				{
					"when": "editorFocus && resourceLangId == javascript",
					"command": "extension.demo.testMenuShow",
					"group": "navigation"
				}
			],
			// 编辑器标题右键菜单
			"editor/title/context": [
				{
					"when": "resourceLangId == javascript",
					"command": "extension.demo.testMenuShow",
					"group": "navigation"
				}
			],
			// 资源管理器右键菜单
			"explorer/context": [
				{
					"command": "extension.demo.getCurrentFilePath",
					"group": "navigation"
				},
				{
					"command": "extension.demo.openWebview",
					"group": "navigation"
				}
			]
		},
		// 代码片段
		"snippets": [
			{
				"language": "javascript",
				"path": "./snippets/javascript.json"
			},
			{
				"language": "html",
				"path": "./snippets/html.json"
			}
		],
		// 自定义新的activitybar图标,也就是左侧侧边栏大的图标
		"viewsContainers": {
			"activitybar": [
				{
					"id": "beautifulGirl",
					"title": "美女",
					"icon": "images/beautifulGirl.svg"
				}
			]
		},
		// 自定义侧边栏内view的实现
		"views": {
			// 和 viewsContainers 的id对应
			"beautifulGirl": [
				{
					"id": "beautifulGirl1",
					"name": "国内美女"
				},
				{
					"id": "beautifulGirl2",
					"name": "国外美女"
				},
				{
					"id": "beautifulGirl3",
					"name": "人妖"
				}
			]
		},
		// 图标主题
		"iconThemes": [
			{
				"id": "testIconTheme",
				"label": "测试图标主题",
				"path": "./theme/icon-theme.json"
			}
		]
	},
	// 同 npm scripts
	"scripts": {
		"postinstall": "node ./node_modules/vscode/bin/install",
		"test": "node ./node_modules/vscode/bin/test"
	},
	// 开发依赖
	"devDependencies": {
		"typescript": "^2.6.1",
		"vscode": "^1.1.6",
		"eslint": "^4.11.0",
		"@types/node": "^7.0.43",
		"@types/mocha": "^2.2.42"
	},
	// 后面这几个应该不用介绍了
	"license": "SEE LICENSE IN LICENSE.txt",
	"bugs": {
		"url": "https://github.com/sxei/vscode-plugin-demo/issues"
	},
	"repository": {
		"type": "git",
		"url": "https://github.com/sxei/vscode-plugin-demo"
	},
	// 主页
	"homepage": "https://github.com/sxei/vscode-plugin-demo/blob/master/README.md"
}
命令
前面项目构建完成后运行看效果实际上完成了三件事:
- 注册onCommand的激活事件:
onCommand:extension.helloWorld,所以插件会在运行Hello World命令的时候被激活。 - 在
contributes.commands配置 Hello World命令,并绑定到extension.helloWorld上 - 使用VSCode API
commands.registerCommand绑定方法到已经注册的命令IDextension.helloWorld上
创建命令
在extension.ts中,添加以下代码:
jscontext.subscriptions.push(vscode.commands.registerCommand('extension.sayHello', () => {
	vscode.window.showInformationMessage('您执行了extension.sayHello命令!');
}));
然后在package.json清单位置,添加声明
json"commands": [
	{
		"command": "extension.sayHello",
		"title": "Hello World"
	},
]
说明:vscode.commands.registerCommand是注册命令的API,返回Disposable,最后将结果放到context.subscriptions中
回调函数参数
注册命令回调函数可接受uri参数
- 注册资源管理器右键命令时,会把选中的资源路径uri传到回调函数中;
- 在编辑器打开文件中右键,则会将当前文件路径回调回去;
- 使用ctrl+shift+p执行命令时,则uir为空;
在extension.ts中添加:
javascriptcontext.subscriptions.push(vscode.commands.registerCommand('extension.showMyPath', (uri)=>{
		vscode.window.showInformationMessage(`当前文件路径:${uri ? uri.path : 'kk'}`);
	}));
package.json添加:
json"menus": {
    "editor/context": [
        {
            "when": "editorFocus",
            "command": "extension.showMyPath",
            "group": "navigation"
        }
    ],
    "explorer/context": [
        {
            "command": "extension.showMyPath",
            "group": "navigation"
        }
    ]
}
创建菜单
一个菜单项创建如下:
json"contributes": {
	"menus": {
		"editor/title": [{
			"when": "resourceLangId == markdown",
			"command": "markdown.showPreview",
			"alt": "markdown.showPreviewToSide",
			"group": "navigation"
		}]
	}
}
-
editor/title是key值,定义这个菜单出现在哪里; -
when控制菜单合适出现; -
command定义菜单被点击后要执行什么操作; -
alt定义备用命令,按住alt键打开菜单时将执行对应命令; -
group定义菜单分组;
插件位置选择
- 资源管理器上下文菜单 -
explorer/context - 编辑器上下文菜单 -
editor/context - 编辑标题菜单栏 -
editor/title - 编辑器标题上下文菜单 -
editor/title/context - 调试callstack视图上下文菜单 -
debug/callstack/context - SCM标题菜单 -
scm/title - SCM资源组菜单 -
scm/resourceGroup/context - SCM资源菜单 -
scm/resource/context - SCM更改标题菜单 -
scm/change/title - 左侧视图标题菜单 -
view/title - 视图项菜单 -
view/item/context - 控制命令是否显示在命令选项板中 -
commandPalette
图标在commands里面配置,light和dark分别对应浅色和深色主题,如果不配置图标则直接显示文字:
json"commands": [
	{
		"command": "extension.demo.testMenuShow",
		"title": "这个菜单仅在JS文件中出现",
		"icon": {
			"light": "./images/tool-light.svg",
			"dark": "./images/tool-light.svg"
		}
	}
]
时机when
通过可选的when语句,VS Code可以很好地控制什么时候显示菜单项,当然,when语句语法不仅仅适用于菜单项的控制。
when语句语法有很多,这里列举几个常用的:
resourceLangId == javascript:当编辑的文件是js文件时;resourceFilename == test.js:当当前打开文件名是test.js时;isLinux、isMac、isWindows:判断当前操作系统;editorFocus:编辑器具有焦点时;editorHasSelection:编辑器中有文本被选中时;view == someViewId:当当前视图ID等于someViewId时;- 等等等
多个条件可以通过与或非进行组合,例如:editorFocus && isWindows && resourceLangId == javascript。
有关when语句的更多完整语法请参考官方文档:https://code.visualstudio.com/docs/getstarted/keybindings#_when-clause-contexts
alt
alt很好理解,表示没有按下alt键时,点击右键菜单执行的是command对应的命令,而按下了alt键后执行的是alt对应的命令。这里不做过多解释。
group
组间排序
控制菜单的分组和排序。不同的菜单拥有不同的默认分组
editor/context中有这些默认组:
navigation- 放在这个组的永远排在最前面;1_modification- 更改组;9_cutcopypaste- 编辑组z_commands- 最后一个默认组,其中包含用于打开命令选项板的条目。
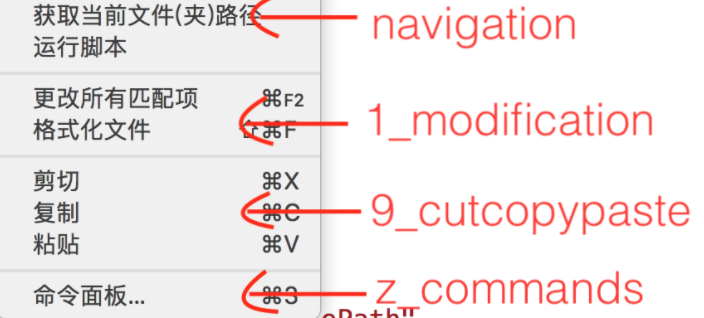
除了navigation是强制放在最前面之外,其它分组都是按照0-9、a-z的顺序排列的,所以如果你想在1_modification和9_cutcopypaste插入一个新的组别的话,你可以定义一个诸如6_test:
explorer/context有这些默认组:
- navigation - 放在这个组的永远排在最前面;
- 2_workspace - 与工作空间操作相关的命令。
- 3_compare - 与差异编辑器中的文件比较相关的命令。
- 4_search - 与在搜索视图中搜索相关的命令。
- 5_cutcopypaste - 与剪切,复制和粘贴文件相关的命令。
- 7_modification - 与修改文件相关的命令。
在编辑器选项卡上下文菜单有这些默认组:
- 1_close - 与关闭编辑器相关的命令。
- 3_preview - 与固定编辑器相关的命令。
在editor/title有这些默认组:
- 1_diff - 与使用差异编辑器相关的命令。
- 3_open - 与打开编辑器相关的命令。
- 5_close - 与关闭编辑器相关的命令。
组内排序
默认同一个组的顺序取决于菜单名称,如果想自定义排序的话可以再组后面通过@<number>的方式来自定义顺序,例如:
json"editor/context": [
	{
		"when": "editorFocus",
		"command": "extension.sayHello",
		// 强制放在navigation组的第2个
		"group": "navigation@2"
	},
	{
		"when": "editorFocus",
		"command": "extension.demo.getCurrentFilePath",
		// 强制放在navigation组的第1个
		"group": "navigation@1"
	}
]
快捷键
json"contributes": {
	"keybindings": [{
		// 指定快捷键执行的操作
		"command": "extension.sayHello",
		// windows下快捷键
		"key": "ctrl+f10",
		// mac下快捷键
		"mac": "cmd+f10",
		// 快捷键何时生效
		"when": "editorTextFocus"
	}]
}
如果您想了解更多有关快捷键绑定的详细细节可以继续阅读官方文档:https://code.visualstudio.com/docs/getstarted/keybindings
打包发布
本地打包
打包需要借助vsce工具,先安装:
shellnpm i vsce -g
cd到项目根目录,运行打包命令:
shellvsce package
生成的vsix,可在vscode插件窗口,右上角选择Install from VSIX安装
发布到应用市场
-
注册Miscrosoft账户,已经有账户的直接进入下一步
-
访问https://aka.ms/SignupAzureDevOps,没使用过会出现如下提示框,直接点继续

-
创建令牌
进入组织主页后,点击右上角,选择
Personal access tokens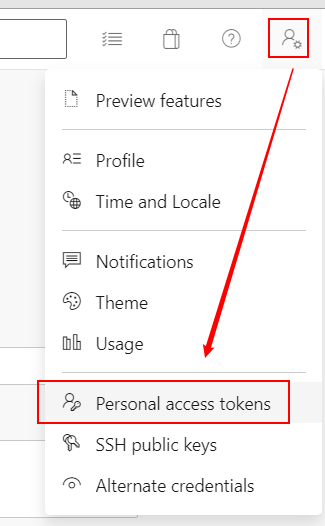
选择New Token,会出现下面界面,
Organization要选择all accessible organizations,Scopes要选择Full access,否则后面发布会失败。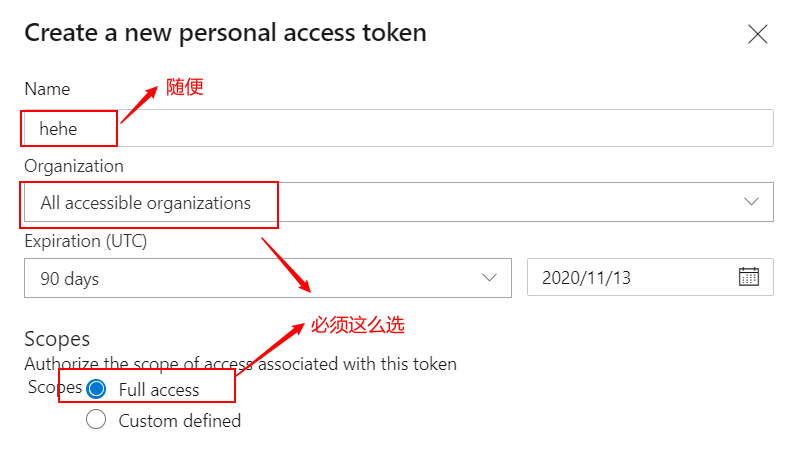
随后就会生成一个令牌,此时必须拷贝保存起来,要是忘了就找不回来了。
-
创建发布账户
获得令牌后,接下来创建发布者
shellvsce create-publisher your-publisher-name此处
your-publisher-name需要以字母数字下划线组成,然后依次输入昵称,邮箱,和刚才生成的令牌。shellE:\Projects\vscode_extension\plugin-bear (master) (bear@0.0.1) λ vsce create-publisher lgx123 Publisher human-friendly name: (lgx123) 呵呵到天亮 E-mail: 1134569285@qq.com Personal Access Token: **************************************************** DONE Created publisher 'lgx123'.创建成功后,默认会登陆这个账户,假如已经创建过账户了,可以直接登陆:
shellvsce login your-publisher-name也可以用网页版来创建发布账户:https://marketplace.visualstudio.com/manage
-
发布
上面登陆好发布者账户后,直接可以运行发布命令:
shellvsce publish成功结果:
shellvsce publish
Executing prepublish script 'npm run vscode:prepublish'...


> bear@0.0.1 vscode:prepublish E:\Projects\vscode_extension\plugin-bear

> npm run compile


> bear@0.0.1 compile E:\Projects\vscode_extension\plugin-bear

> tsc -p ./

Personal Access Token for publisher 'lgx': ****************************************************

Publishing lgx.bear@0.0.1...
 DONE  Published lgx.bear@0.0.1
Your extension will live at https://marketplace.visualstudio.com/items?itemName=lgx.bear (might take a few minutes for it to show up).
发布成功稍等几分钟即可在应用市场搜到,也可在vscode网页应用市场搜到
https://marketplace.visualstudio.com/items?itemName=lgx.bear

-
发布注意事项
README.md文件默认会显示在插件主页;README.md中的资源必须全部是HTTPS的,如果是HTTP会发布失败;CHANGELOG.md会显示在变更选项卡;- 如果代码是放在git仓库并且设置了repository字段,发布前必须先提交git,否则会提示
Git working directory not clean;
-
增量发布
版本号:
major.minor.patch如果想让发布之后版本号的patch自增,例如:
1.0.2->1.0.3,可以这样:shellvsce publish patch结果:
shellvsce publish patch
v0.0.2
Executing prepublish script 'npm run vscode:prepublish'...


> bear@0.0.2 vscode:prepublish E:\Projects\vscode_extension\plugin-bear

> npm run compile


> bear@0.0.2 compile E:\Projects\vscode_extension\plugin-bear

> tsc -p ./

Publishing lgx.bear@0.0.2...
 DONE  Published lgx.bear@0.0.2
Your extension will live at https://marketplace.visualstudio.com/items?itemName=lgx.bear (might take a few minutes for it to show up).
执行这个命令后会自动修改
package.json里面的版本号。同理,vsce publish minor也是可以的。 -
取消发布
shellvsce unpublish (publisher name).(extension name) -
更新
如果修改了插件代码想要重新发布,只需要修改版本号然后重新执行
vsce publish即可 -
vsce 其他命令
shell# vsce --help Usage: vsce [options] [command] Options: -V, --version output the version number -h, --help output usage information Commands: ls [options] 列出实际会发布的文件列表 package [options] 打包成一个插件 publish [options] [<version>] 发布插件 unpublish [options] [<extensionid>] 插件下架 list <publisher> 列出某个发布者下所有发布的,需要配置好token 额,不然会提示输入 ls-publishers 列出所有已知的发布者 create-publisher <publisher> 创建一个新的发布者 delete-publisher <publisher> 删除一个发布者 login <publisher> 登录一个发布者到发布者列表中 logout <publisher> 反之,退出发布者
本文大部分内容出自http://blog.haoji.me/?tag=vscode
本文作者:呵呵到天亮
本文链接:
版权声明:本博客所有文章除特别声明外,均采用 BY-NC-SA 许可协议。转载请注明出处!